Sublimet

How to use Cricut EasyPress

Select your model in each section below for basic instructions on using the Cricut EasyPress.

Controls

Simple Cricut EasyPress controls are the secret to its success. You'll love the results.

Three simple heat configurations take care of all possible heat transfer projects, including permanent Infusible Ink transfers. Simply press the button once to turn it on and set the temperature to Low.

Press again to go through the settings and turn it off. Orange lights mean it's heating up. Green lights mean that the temperature has been reached.

Cómo usar Cricut EasyPress Mini

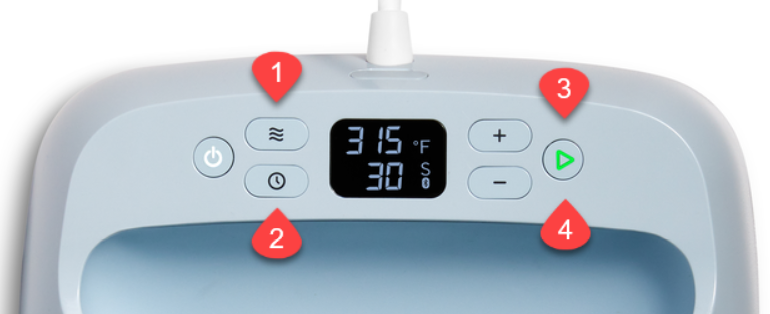
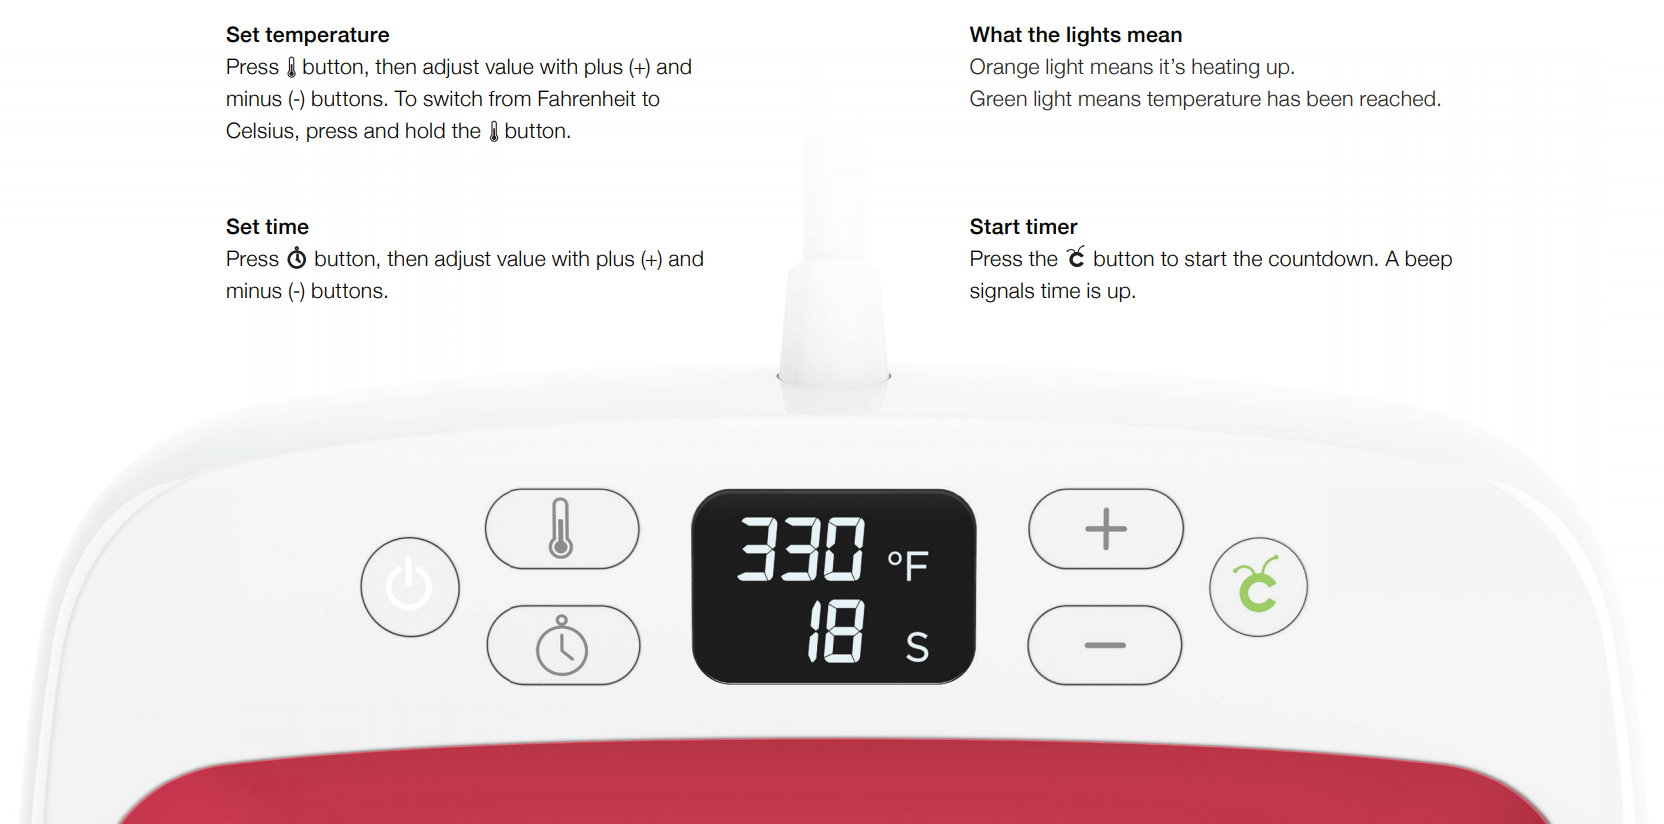
1. Select and set temperature

Press the temperature button, then adjust the value with the plus (+) and minus (-) buttons. To switch from Fahrenheit to Celsius, press and hold the temperature button until you see the change from °F to °C on the screen.

2. Set Time

Press the time button, then adjust the value with the plus (+) and minus (-) buttons.

3. What the lights mean

Orange light means it is heating up.

The green light means that the temperature has been reached.

4. Start the Timer

Press the Go button to start the countdown. If you use EasyPress 3 with the Cricut Heat app, the app will display the timer countdown. A beep indicates when time is up.

Cómo usar Cricut EasyPress 2

Cricut EasyPress

Tips for remembering

  • Always use Cricut EasyPress Mini at room temperature.
  • Before using Cricut Easy Press Mini, make sure that the fabrics and other base materials are completely dry.
  • When not in use, always return Cricut EasyPress Mini to your security base.
  • When using Cricut EasyPress Mini on well-formed objects such as shoes and hats, use a shoe, hat or towel mold folded inside to create a firm pressing surface. 
  • The design sizes for the application with Cricut EasyPress Mini range from the smallest area you can reach with the precision tip to a surface area that is about twice the heat plate. The recommended settings are optimized taking into account the maximum sizes:
  •       For ironing: 4" W x 3.5" L or 1.7" W x 5.25" L.
  •        Ink infusible: 2.75" wide x 2.75" long or 1.625" wide x 5" long.
  • Cricut EasyPress Mini continuously moves over the design during the transfer. Be sure to cover all areas of the design, including the center and edges. Allow the heat plate to extend approximately 0.5" (13 mm) beyond all edges of the design.
  • Always use Cricut EasyPress at room temperature. 
  • Before using Cricut EasyPress, make sure that the fabrics and other base materials are completely dry.
  • Always return Cricut EasyPress to your security base when not in use.
  • Before using Cricut Easy Press, make sure there is no tape or protective film over your control panel.

Ironing instructions

1) Turn on the Cricut EasyPress Mini.

For flat base materials, find a firm, flat, heat-resistant surface around the high waist and use an Easypress Mat to protect the surface. 

For objects with shapes that are hollow, such as shoes and hats, use a mole or a folded towel inside to create a firm pressure surface. 

Be sure to avoid flimsy or fragile ironing boards.

2) Adjust the temperature.

  • Use the Cricut Heat Guide to determine project settings.
  • When turning on the machine, the temperature is set to Low. Press the button again for Medium and again for High.
  • Orange lights mean it's heating up. Green lights indicate that the temperature has been reached.
  • Be very careful. The machine operates at high temperatures that can cause burns.

3) Set the timer separately to the recommended time.

4) Preheat the base material. Move Cricut EasyPress Mini over the application area for the recommended time.

5) Design position.Make sure the shiny side (transparent protective foil) is facing up.

6) Apply heat to both sides.

  • Start the stopwatch and move the Cricut EasyPress Mini continuously through the design until the stopwatch reaches 0. Cover all areas of the design, including the center and edges, and allow the heat plate to extend approximately 13 mm (0.5") beyond all edges of the design.
  • Flip the base material over and heat the back of the design for the recommended time.

7) Before removing the coating, refer to the Cricut Heat Guide to determine the peeling temperature: warm or cold.

1) Turn on the Cricut EasyPress Mini.

  • Look for a firm, flat, heat-resistant surface at waist height.
  • Be sure to avoid flimsy or fragile ironing boards.

2) Adjust the timer and temperature.

  • Use the Cricut Heat guide or the Cricut Heat app (for Cricut EasyPress 3) to determine project settings.
  • Press the timer, then use the +/- buttons to set the recommended time.
  • The Cricut heat app can send settings directly to Cricut EasyPress 3.
  • Press temperature, then use the +/- buttons to set the recommended temperature.
  • The Cricut Heat app can send configurations directly to Cricut EasyPress 3.
  • Orange light means it is heating up. The green light means that the temperature has been reached. A beep sounds when it is ready.
  • Be very careful. The machine operates at high temperatures that can cause burns.

3) Preheat the base material. Place Cricut EasyPress on the fabric for the recommended time.

Precaliente el material base. Coloque Cricut EasyPress sobre la tela durante el tiempo recomendado.4) Design position: Make sure the bright side (transparent support sheet) is facing up.

Posición del diseño: Asegúrese de que el lado brillante (lámina transparente de soporte) esté hacia arriba.

5) Apply heat to both sides.

  • Place Cricut Easy Press on the base material, then press the Go button to start the timer.
  • Place Cricut EasyPress in place and apply the recommended pressure.
  • Flip the base material over and heat the back of the design for the recommended time.

Aplique calor a ambos lados.

6) Before removing the carrier sheet, refer to the Cricut Heat Guide or the Cricut Heat app (for Cricut EasyPress 3) for instructions on peeling temperature.

Antes de quitar la hoja portadora, consulte la Guía de calor de Cricut o la aplicación Cricut Heat (para Cricut EasyPress 3) para obtener instrucciones sobre la temperatura de pelado.

Instructions for Infusible Ink

Infusible Ink projects have special instructions depending on the target and injectable ink product you are using. Refer to the Cricut Heat Guide for stacking settings and instructions. Here are some basic steps to keep in mind.

Note: Make sure your design is within the maximum design sizes recommended for using Cricut EasyPress Mini with infusible ink (2.75" W x 2.75" L or 1.625" W x 5" L).

Note: At this time we do not recommend using Cricut EasyPress Mini for Infusible Ink transfers on coasters.

What you need: 

  • Cricut EasyPress Mini
  • Rug for Cricut EasyPress
  • Cricut clothing or blank bag
  • Cut-out design of the Infusible Ink transfer sheet or created with Infusible Ink pens/markers
  • Stencil paper (2)
  • White cardboard (80 lb) (colored cardboard not recommended)
  • Roller remover
  • Scissors
  • Pincers
  • Heat-resistant tape

      1) Turn on Cricut EasyPress Mini.

        Look for a firm, flat, heat-resistant surface around the waist. Use an EasyPress Mat to protect your surface.

          Be sure to avoid flimsy or fragile ironing boards.

            2) Adjust the temperature.

            • Use the Cricut Heat Guide to determine project settings.
            • When the machine is turned on, the temperature is set to Low. Double-tap to get to High
            • Orange lights mean it's heating up. Green lights indicate that the temperature has been reached.
            • Be very careful. The machine operates at high temperatures that can cause burns.

            3) Set the timer separately to the recommended time.

            4) Preheat the base material. Protect the blank with stencil paper and move the Cricut EasyPress Mini throughout the application area for the recommended time.

            5) Prepare for the transfer. Follow the instructions in the Cricut Thermal Guide to stack the mat, cardboard, blank paper, and stencil paper.

            • Trim the Ink Ink transfer sheet coating near the design, then secure it to the target with heat-resistant tape to prevent it from moving during transfer.
            • Infusible Ink pen and marker designs are also fixed to the blank with the heat-resistant tape.

            6) Apply heat: Start the stopwatch and move the Cricut EasyPress Mini continuously throughout the design until the stopwatch reaches 0. Cover all areas of the design, including the center and edges, and allow the heat plate to extend approximately 0.5" (13 mm) beyond all edges of the design.

            7) Let the project cool down. Once it cools, slowly remove the stencil paper, tape, and design.

            Infusible Ink projects have special instructions. Carefully follow the instructions for your specific project in these Infusible articles.

            Tips to keep in mind:

            • Use a Cricut EasyPress or Cricut Pressing Mat instead of a folded towel. Towels retain too much moisture and cause unwanted transfer effects.
            • For precise time and temperature settings and recommended pressure for your project, refer to the Cricut Heat Guide or the Cricut Heat app (for Cricut EasyPress 3).
            • Avoid seams, buttons, and closures when placing the Cricut EasyPress on the base material. If the heat plate crosses these elements, the design will not receive uniform heat, which will lead to unwanted effects. When applying designs to unusual objects, around seams or in hard-to-reach places, use Cricut EasyPress Mini.
            • Do not slide Cricut EasyPress or move your hands over the press during transfer. Keep the battery as still as possible.
            • Use with extreme caution. The machine operates at high temperatures that can cause burns. Similarly, the base materials will be hot after preheating and transfer. Allow them to cool before handling.
            Product added to wishlist
            Product added to compare.