Sublimet
Sticker
Personalized ID tags with magnetic closure PLM 69
Name badges with magnetic closure PLM 69

Name badges with magnetic closure PLM 69

(5)
(1)

€3.40 Price excludes VAT

€4.11 Price includes VAT

Quantity 10 u. 100 u.
Discount 25% 60%
Colour : Shiny silver

  • Anthracite
  • Shiny silver
  • Matt silver

Name badges with magnetic closure PLM 69 include all the necessary parts to create your own rectangular custom nameplates: the plastic body, the magnifying glass and the magnet closure. The 69 x 34 mm printing surface is ideal to complete with the company logo next to the person's name. To cut the design it is recommended to use a cutting die. 

Main features:

  • Shape: rectangular.
  • Overall size: 75 x 36 mm.
  • Material: plastic body, transparent plastic lid and magnet closure.
  • Printable Area: 69 x 34 mm.
  • Printable sides: one side.
  • Assembly: Manual (assembles in seconds).
  • Finish: Matt silver, Gloss silver or Anthracite.
  • Powerful Magnetic Closure: to fix them on any type of garment.
  • Do not pierce or damage garments.
  • Suitable for all types of clothing and accessories: shirts, jackets, hats, bags, backpacks, etc.

Everything you need to create your custom name badges:

1 x ABS plastic nameplate.
1 x Methacrylate magnifying glass.
1 x Magnetic closure.

Marking techniques

  • Digital
 

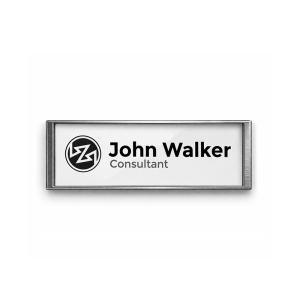
Badges or Name plates are a simple and practical way to create labels for people attending a social, business or political event. They can be assembled manually in seconds, so they are widely used to identify organizers, speakers or volunteers in all kinds of events such as courses, seminars, exhibitions and fairs.

They are also used to quickly identify company personnel, based on their name and job title. It is the ideal size to personalize with a logo, hierarchical position or function, along with the name of the people.

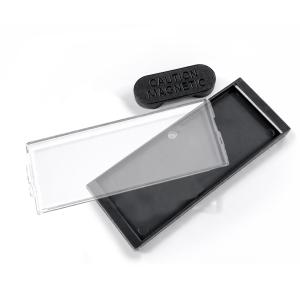
These name badges have a powerful magnetic closure that is used to fix them on any type of garment, without having to pierce or damage the fabric. The fabric is simply sandwiched between the two magnets to fix the tag. They can be used on all types of clothing or jackets, as well as other accessories such as hats, bags or backpacks.

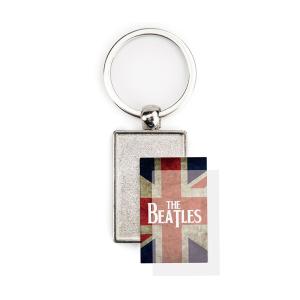
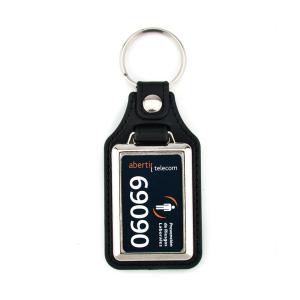
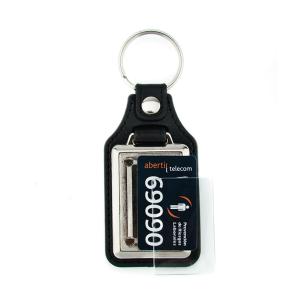
To create keychains or badges with the C-50 machine, a design must be created and printed on a normal printer. The corresponding cutting accessory is then used to cut the design to the proper size and shape. Finally, the assembly tool is used on the C-50 machine to assemble the consumables for keyrings or badges.

Shape
Rectangular
Material
Plastic
Marking techniques
Digital
Printable area
69 x 34 mm
Printable sides
1
Origin
Made in EU
133030050-1-UNICA-PLATEADOB
Sticker
Sticker
Sticker
Sticker
Sticker
Sticker
Sticker
Imitation leather rectangular keychains MD-40 Imitation leather rectangular keychains MD-40 2
  • -10%
  • Out-of-Stock
Out-of-Stock
Sticker
Printable areaMachineCutting toolAssembly ToolKeychain / Badge / Magnet
Ø 25 mm

Keychain and

Name Badge Maker

C-50

Circular die cutter 25 mm MC-25R Assembly tool imitation leather keychains UM-MD25 Imitation leather circular keychains MD-25
Imitation leather circular keychains MD-25 Carro
Assembly tool drop keychains UM-MH CARRO Metal keychain with coin for shopping cart MH-CARRO
Manual assembly Acrylic keychains with coin for shopping cart CR-Z
Bracelet keychains WRT-25
Assembly tool keychains SM-25D Circular metal keychains SM
Ø 33 mm Circular die cutter 33 mm MC-33R Assembly tool keychains SM-33D
Assembly tool keychain UM-33 Circular metal keychain MO-33D
25 x 25 mm Square die cutter 25 x 25 mm MC-25C Assembly tool keychains SM-10D Square metal keychains SM-10D
House House keychain die cutter MC-Y Assembly tool house keychain UM-MY House shaped metal keychains MY
T-shirt T-shirt keychain die cutter MC-X Assembly tool T-shirt keychains UM-MX T-shirt shaped metal keychains MX
Manual assembly T-shirt shaped acrylic keychains CR-X
25 x 40 mm Rectangular die cutter 25 x 40 mm MC-40C Assembly tool imitation leather keychains UM-MD40 Imitation leather rectangular keychains MD-40
Assembly tool keychains SM-40D Rectangular metal keychains SM-40D
Assembly tool keychains UM-40 Rectangular metal keychains ML-40
Manual assembly Rectangular acrylic keychains CF-40
35 x 50 mm Rectangular die cutter 35 x 50 mm MC-50C Rectangular acrylic keychains CR-50
64 x 22 mm ID Badge die cutter 64 x 22 mm ID badges with magnetic closure PLM 64
69 x 34 mm ID Badge die cutter 69 x 34 mm ID badges with magnetic closure PLM 69
57 x 57 mm Square die cutter 57 x 57 mm MAG-57 Fridge magnets 57 x 57 mm MAG-57
70 x 45 mm Rectangular die cutter 70 x 45 mm MC-70C Fridge magnets 70 x 45 mm MAG-70
90 x 60 mm Without machine Manual Cut Fridge magnets 90 x 60 mm MAG-JUMBO

How to create custom Magnets, Keychains and Name Badges:

  1. Printing:
    • Select the design you want to print. It can be a logo, a text, an image, a photograph, or a combination of these.
    • It is recommended to use a design program to create templates according to the size of the product. The template can include guidelines to facilitate cutting and assembly.
    • Remember that the paper will be cut to the exact size and shape of the product to be assembled, so the design should not exceed these dimensions.
    • Print the design on paper, using your usual printer.
  2. Cutting:
    • To cut the paper to the correct size it is recommended to use a cutter or die cutter of the size that corresponds to the product you want to create.
    • Attach the cutting tool to the C-50 Machine as indicated in the description of the selected cutter or cutting die.
    • Place the paper in the chosen cutter so that the design is centered in the cutter's viewing window.
    • Slide the lever down, exerting light pressure.
    • The design is ready to mount on the keychain or magnet.
    • Once all the papers have been cut, remove the cutting die from the machine so that the assembly tool can be attached if necessary.
  3. Assembly:
    • Select the assembly tool corresponding to the keychain or name badge you want to create.
    • Attach the upper part of the assembly tool to the moving part of the C-50 Machine and tighten the side screw to fix it.
    • Place the lower part of the assembly tool on the base of the machine, aligning the guide pin on the part with the hole in the base.
    • Put the printed and cut paper in place on the product you want to assemble.
    • Place the magnifying glass or transparent piece on the paper with the design.
    • Place the product in the lower mold of the machine, so that it fits correctly.
    • Pull the lever to insert the magnifying glass fully.
    • Remove the finished product from the machine.

In the case of acrylic magnets, keychains and name badges, the machine is used to cut the paper but assembly can be done manually. Simply put the design in position and rest the transparent piece on it. Finally, press with your hands until you hear a click.

Reviews

Grade 
Quality


06/04/2025

Práctico y fácil de personalizar

Cumple su función correctamente. El cierre magnético es práctico y la superficie se personaliza sin dificultad.

Write your review

Name badges with magnetic closure PLM 69

Write your review

Customers who bought this product also bought:

Product added to wishlist
Product added to compare.